Transitioning from C++ to Java

Introduction

For a developer who wants to switch from one main programming language to another this might seem quite challenging (and depending on the concrete cases, it certainly can be) at first. Fortunately, many programming languages have a lot of commonalities since you won’t redevelop the wheel but rather reuse existing proven concepts from an older language.

This is especially the case, if you compare two programming languages where one serves as a basis of inspiration to the other. Java is such a language, where you find a lot of concepts/structures from C/C++; in several cases even the same.

However, when looking at things in detail, there are also cases where concepts seem to be the same at first glance, but have noticeable differences in detail.

This blog post showcases some of these differences and commonalities between Java and C/C++. The listing is far from being complete and just a subjective selection of items picked by the author which popped up while working through the ‘programming bible’ for Java developers: Java ist auch eine Insel [1].

Java and C++ – Commonalities and Differences

The following table depicts the language features of C/C++ and Java and is meant as a rough overview of noticeable differences and commonalities (in the opinion of the author). It is not meant as a summary for every developer (since what’s important in one’s opinion is obviously different from person to person).
Also it’s beyond the scope of this blog post to explain what each concept means. Therefore, we expect that the reader has a decent knowledge about C++ and we don’t mention anything if there are no important difference other than the name for the listing (f.e. auto in C++ vs. var in Java).
Beyond the author’s own experience/knowledge, the main source for looking details up were the already mentioned Java book as well as posts on Stackoverflow [2] and the cppreference.com-page [3].

ConceptC++Java
autokeyword: auto (new in C++11)keyword: var (new in Java 10)
constkeyword: constkeyword: final
final is certainly not a full equivalent to C++’s const keyword. Since there’s no real ‘constness’ in Java, specifying a local variable (or method argument) as final still allows you to modify the object. Only the variable/argument itself cannot be changed (C++ equivalent: const int i = 0;).

Note that in Java you can do a ‘delayed initialization’ of a final variable. As long as the variable is only initialized once, that’s still fine if you specify it as final. Example:
final int a;
[…]
a = 15
namespacekeyword: namespacekeyword: package
usingkeyword: usingkeyword: import
Java also allows to import static class methods/members, which is not possible in C++. Example:
class Foo {
public static void bar() {}
}

Then you can use the bar()-method in a different class simply like:
import static [PACKAGE_NAME].Foo.bar;
[…]
class Foo2 {
public static void bar2() { bar(); }
}
enumskeyword: enum class/struct (new in C++11)

static_cast must be used to convert to int.

Normal (pre-C++11) enums are just ‘integers’ without ‘strict’ type safety.
keyword: enum

Use Foo.ordinal() to convert to int.
++/–/%/+=/-=/etc.-operators These operators are only valid for integer types.In contrast to C++ the prefix/suffix and modulo operators can also be used on float and double.

The same goes for the +=/-=/etc. operators which can mix integer and floating point operands.
Example:
int i = 0;
i += 20.4; // will result in i = 20
>>>-operator n/ARight-shift operator keeping the sign unchanged.
size of char typeUsually 1 byte. However, the standard permits a different size, as long as sizeof(char) <= sizeof(short).2 bytes
constant literal typesThe type of an integer constant is the smallest type which can keep the integer value (beginning with type ‘int’).Always int (use suffix-notation to enforce a different type like long) for integer types.

Floating point constants are double by default (unless suffix is specified) -> same as with C++.
byte (Java)/char/short type in operationsTypes remain unchanged in operations. Types are implicitly cast into int-types so that a + b results in an integer, even if a and b are of type short.

Note:
This even applies to the unary +/- operators!
shadowing variablesEvery variable (local, global, function arguments, or class/object member) can be shadowed.

Recent compilers issue a warning though if this happens.
Only allows shadowing object/class members but not method arguments or local variables.
switch-case-statementAll integer values plus bool and enums are allowed.Allows int-values (not long though!), enums and strings.
Provides extended switch-syntax (4 variants in total. (new in Java 12 / finalized in Java 14)
break/continueValid inside loops – always applies to the inner most loop. Supports syntax with labels to break out of or continue an outer loop.
Break also supported to break out of any block.
range-based-for loopavailable (new in C++11)Available with same syntax as in C++.
class/object members and array initializationNot initialized by default.Initialized by default with 0/null/false.

But:
Local variables are NOT initialized by default (same as with C++).
function parameter evaluation orderright-to-leftleft-to-right!
printf-format stringCurrent compilers usually validate the format string and passed in arguments at compile time and issue warnings.

Note:
There is however no runtime check to ensure that passed in arguments match the specified type!

Arguments and format specifiers are always mapped one-to-one. There is no way to specify one argument and use it for two format specifiers.
Format specifiers are always checked with their passed in argument at runtime.
Note:
The compiler won’t issue a warning!

Favor %n as new line in format string over \n, since the later won’t be converted to a platform specific line ending.
Note:
This is different from C++!
Further note that %n has an entirely different meaning in C++!

Using ‘$x’ (f.e. in ‘%$1f’) allows explicitly specifying a different argument to be used. Using ‘$<‘ specifies that the same argument as used for the previous format specifier is to be used again.
varargsvarargs of different types are supported.

Using special va_list-handling to access and the arguments.
varargs must be of a single type. For example:
void foo(double… bar)

Simple access to varargs like array access.

Can also be passed in an array instead of multiple arguments.
arraysArrays are not objects (in C++11: alternative array class added).

Multi-dimensional arrays always have the same size for each dimension.

No hard limit for number of elements.
Arrays are objects.

Rectangular multi-dimensional arrays supported. For example:
int[][] = new int[][]{{1}, {1, 2, 3, 4}, {1, 2}}
Results in a multi-dimensional array where the first dimension has 3 elements and the second has varying elements: 1, 4, 2.

Hard limit of 2^31 elements within a single dimension.
main()-functionFirst argument is the command line used to call the program.

Exit code directly through return value.
First argument is the first argument passed in in the command line.

No return value. Instead use System.exit(), if exit code must be returned.
stringsString class is mutable.

No hard size limit for strings.
String class is immutable. -> Results in overhead when ‘adjusting’ the string (since new String objects get constructed).
Use StringBuffer (thread-safe)/StringBuilder if string needs to be mutable.

Hard limit at 2^31 characters.
class visibilityNo class visibility of outer classes. You can define a class within a cpp-file to make it kind of ‘private’ (to the single compilation unit).

protected methods/members: only visible in same or derived classes
Classes have their own visibility: public/package
Inner classes can also have private/protected visibility.

protected methods/members: visible to same class, derived classes or other classes in the same package.
Note: There is no visibility to restrict members to (the own and) derived class only!
default visibilitymembers/methods/constructors/destructor: private for classes, public for structs
members/methods/classes: package visibility (class/method/member visible in the same package)

constructors: same visibility as the class visibility

Note: There’s no corresponding C++ construct for package visibility.
default constructordefault constructor dropped, once first custom constructor definedsame as in C++
constructor chainingn/AInside a constructor call:
this(xxx, xxx, …)
to call a different constructor.

Call must be the first line in a constructor.
class initializersconcept: initialize class members in single cpp-file directlyuse static{}-block
nullptr type deductionRequires explicit type-cast of nullptr, if casting is ambiguous. F.e.

class Foo {};
class Foo2 : Foo {
void test(Foo*) {}
void test(Foo2*) {}
}
void main() {
test(nullptr); // compile error – could be Foo* or Foo2*
}
Type deduced for a null pointer based on the context. If either passed in as an argument of a ctor or as an argument for a reference, null type is deducted to the lowest sub class. F.e.

class Foo {};
class Foo2 extends Foo {
void test(Foo f) {}
void test(Foo2 f) {}
};
class Foo3 {
void main() {
Foo2 f = new Foo2();
f.test(null); // will deduce null to Foo2 -> calls test(Foo2 f)
}
}
function range notation conventionusually functions taking a start and end range notation are defined as:
[start, end] – aka: start and end element is included in the range
usually functions taking a start and end range notation are defined:
[begin, end) – aka: start element included but end element not included
For example:
java.util.Array.sort(a, 0, 2) -> sorts array a from 0 to 1 (since 2 is exclusive)

References

[1] – book: “Java ist auch eine Insel, 15. aktualisierte und überarbeitete Auflage” – 2020 (1. Nachdruck 2020) – Author: Christian Ullenboom – Distributor: Rheinwerk Computing (Germany) – ISBN: 978-3-8362-7737-2
[2] – https://stackoverflow.com/
[3] – https://en.cppreference.com/

Updates

2021-09-15: Added enums and strings as switch-case-aruments to Java (and for consistency also added enums to C++, even though these are practically integer values).

2021-09-20: Added following new entries:

  • class initializers
  • class visibility
  • constructor chaining
  • default constructor
  • default visibility
  • enum
  • nullptr type deduction
  • shadowing variables

Partial commits with TortoiseSVN

Introduction

When working on code changes sometimes you end up with spotting a bug alongside the code which you are working on atm.

But how would you handle this? You want to quickly commit the fix, but you have a lot of other changes inside the same file. Creating a patch, making a backup of the file, or using a new checkout of the project are certainly ways to deal with it, but all take a certain amount of overhead and can be error prone.

Here, TortoiseSVN does provide a very handy (but unfortunately also a bit hidden) feature called the Restore-After-Commit functionality which has been around since TortoiseSVN 1.8 already [1].

Working with Restore-After-Commit

The handling on how this feature works is best explained through a simple example.
(Sidenote: WinMerge 2011 is used in the screenshots below to display the local changes.)

Let’s assume we have a single file called test.cpp with a lot of local changes:


The left side shows the content of test.cpp in the repository (at revision 3), the right side shows what we changed inside the file in our working directory.

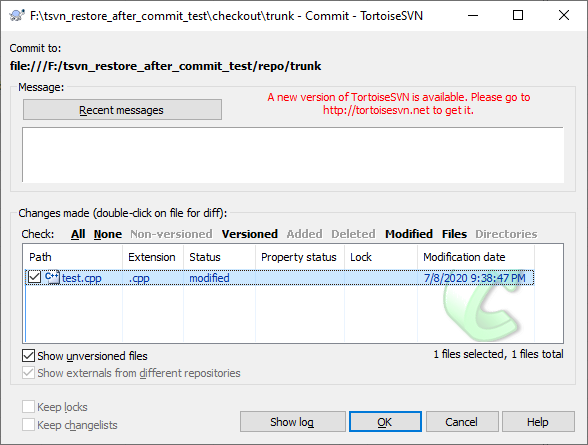
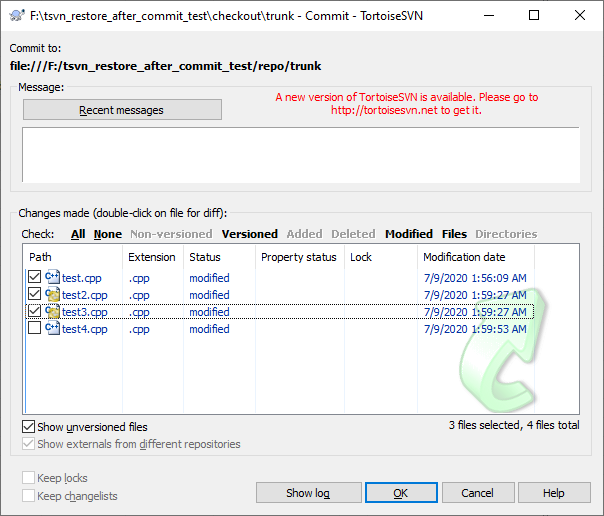
Let’s assume we found a bug in the function foo() which we want to quickly fix without committing the rest of the changes inside that file. For that, we first bring up the TortoiseSVN commit dialog:

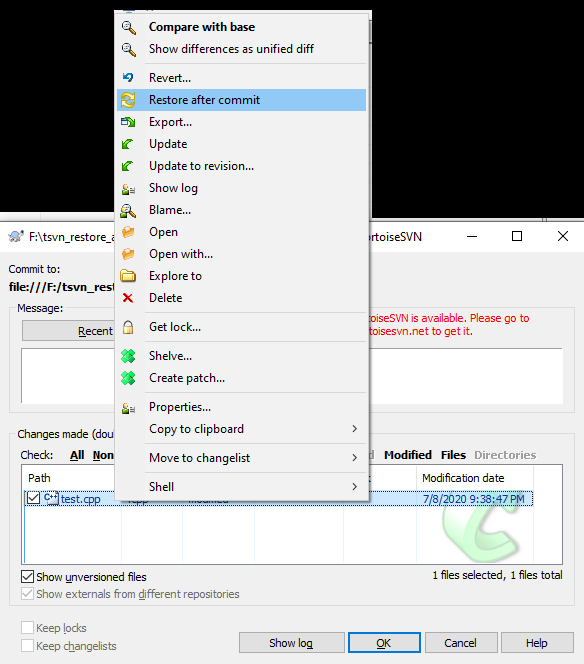
Next we right click the test.cpp file in the ‘Changes made’ list and select “Restore after commit”:

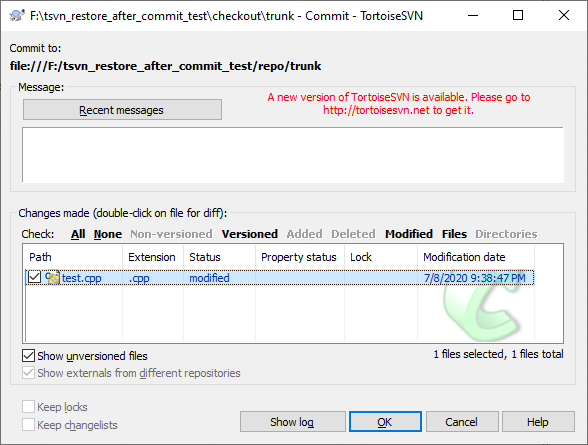
The test.cpp file will show a new overlay icon, depicting that it’s marked for ‘restore after commit’:

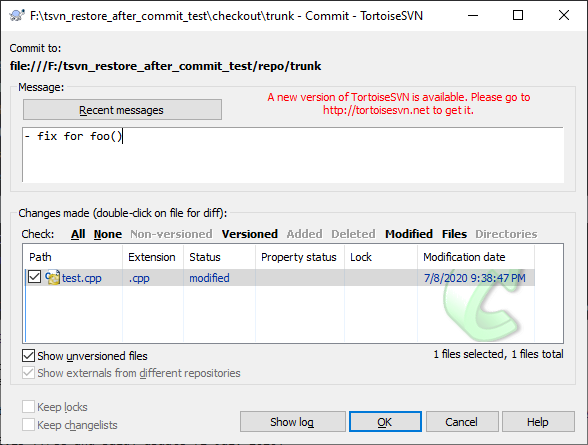
Next, we revert the changes we do not want to commit in that file. Just double clicking the file in the list here and using our diff tool, we revert everything except the one line change in the foo() function:

Afterwards, we commit the file as usual by clicking on OK on the commit dialog:

Bringing up the diff for the file after the successful commit shows that our previous changes were restored, while the fix in foo() was committed in revision 4:

Committing multiple files

Since you can tag each file individually to be restored after a commit, you can also do partial commits of multiple files in one go and even combine it with non-partial file commits.
The following screenshot shows how this might look. In here we have partial file changes in the files test2.cpp and test3.cpp and also commit all changes in test.cpp while the changes in test4.cpp are not part of the commit:

For small changes, this functionality is quite handy and can save you a lot of time where you would otherwise work with reverting and reapplying changes which can be quite time consuming and error prone.

Shelving as another option

It should be mentioned here that as of (Tortoise)SVN 1.10.0, Subversion introduced the experimental shelving functionality. This too is a very handy feature which allows you to put entire changes “on a shelf” to work on another thing in-between. However, for simple changes like the one shown in the example above, the ‘revert after commit’ functionality is still faster to apply and still has its purpose even with the new shelving feature (which is out of scope to be covered in this blog post).

Caveats with the Restore-After-Commit feature

Most of the issues with the feature have been fixed during the 1.8.x timeline [2].
If you are still working for some reason with that old version and are not able to upgrade to TSVN 1.9+ you are strongly suggested to use TSVN 1.8.12, since earlier versions had some bugs with this feature.

On the TSVN 1.9.x timeline the feature unfortunately suffered a display issue resulting in the missing overlay icon for files to be restored after commit. This made it kind of tedious to work with the functionality, as you didn’t see which files were about to be restored, if you didn’t do the partial commit immediately. This issue was finally fixed in TSVN 1.10.0. [3] Unfortunately the fix wasn’t shipped for the 1.9.x versions, since 1.9.8 (which would have included the fix) was never released.

An issue with the functionality however still remains as of today (TSVN 1.14.0 at the time of writing this). When you tag a file to be restored after commit, then try to commit the changes but TortoiseSVN needs to update said file in the process of the commit first (as other changes were applied meanwhile to the file), the file will be restored to its original state after the commit and you will have lost the incoming changes to the file.
Obviously there’s no perfect simple solution for cases like these and you need to manually adjust the file and re-apply the changes. It can get even more messy if the incoming file updates caused conflicts and couldn’t be cleanly applied.
Good practice is therefore to do an update of the file(s)/working copy before you try to do a partial commit, unless you are certain that the commit won’t require a file update first.

References

[1] https://tortoisesvn.net/tsvn_1.8_releasenotes.html
[2] https://tortoisesvn.net/Changelog.txt
[3] https://groups.google.com/forum/?utm_medium=email&utm_source=footer#!msg/tortoisesvn/RnD8CD_Sy_U/Rc09MxJkAQAJ

C++ 11 Feature: nullptr

Introduction

When working with a null pointer in C++ you can run into unexpected behavior with regards to overload resolution.

Assume you have the following code:

When running that code, the developer would most likely be surprised that no new car is added.
The explanation for this behavior lies in NULL not really being a pointer but rather a macro which is usually just declared as 0 [1].

With that knowledge it’s obvious what the code did above. Instead of calling the buildCar() function taking the engine as a parameter, it called the version for specifying the number of cars to built and passed in 0. That results in no call to addNewCar() being made.

The nullptr idiom

The C++ 98/03 standard unfortunately doesn’t provide any means to prevent this from happening which in real world applications can cause quite a bunch of bugs/unintended behavior.

While things are quite clear in the example given above, it can easily become less apparent the more complex the code grows and the effect of NULL not being a pointer can therefore be quite easily overlooked when refactoring/simplifying code.

To resolve the problem, the nullptr idiom was developed [2] which is also described in Scott Meyers’ 2nd edition of “Effective C++” (Item 25).

The solution introduces a new class called nullptr_t which is then used instead of using NULL in code.

Making use of operator overloading, instances of the class can be assigned to any pointer type but are not valid to be used with integer/floating point types and also won’t be valid for conversions specified for number values.

If we adjust our previous example to use the nullptr idiom, the code would behave as expected and adds a single car with the standard engine:

This example however also quite well depicts the limitation of that approach:
You need to include another header in the project and not being part of the C++ standard, it’s not portable when it comes to library development.

There are also other related limitations of this approach which are less likely to be applicable for most developers and hence out of scope for this blog post. [3]

nullptr in C++11

The standard committee recognized the limitation with nullptr and in the C++11-standard, introduces nullptr as a distinct keyword which can be assigned to pointers and (hence) used as an rvalue but cannot be assigned to (or converted to) non-pointer types.

The one important thing to realize is that you need to use the nullptr-keyword directly instead of keeping using NULL.

For backwards compatibility NULL is allowed to remain declared as 0 and as a developer the only way to make sure that nullptr is being used is to use the keyword directly.

Compiler support

Any recent compiler supports the feature already since years. The following shows the support in a selection of widely used compilers: [4]

  • Clang: >= 2.9 (released April 2011) [6]
  • GCC: >=4.6.0 (released March 2011) [7]
  • Intel C++: >= 12.1 (i.e. 12 Update 6 – released August 2011) [8]
  • Microsoft Visual Studio: 2010 (April 2010) [9/10]

References/Footnotes

[1] As of C++11 the macro is also allowed to be defined as a prvalue of type std::nullptr_t [5],  though to the knowledge of the author, most compilers still stick with the declaration to 0 to ensure backwards compatibility.
Also while it’s valid by the C-standard to define NULL as (void*)0 which would have also prevented the overload ambiguity, this was never valid by the C++-standard as converting type void* to another pointer type was not permitted. [11]
[2] https://en.wikibooks.org/wiki/More_C++_Idioms/nullptr
[3] “A name for the null pointer: nullptr (revision 4) – SC22/WG21/N2431 (2007-10-02)
[4] https://en.cppreference.com/w/cpp/compiler_support
[5] https://en.cppreference.com/w/cpp/types/NULL
[6] http://releases.llvm.org/
[7] https://gcc.gnu.org/releases.html
[8] https://software.intel.com/sites/default/files/44/c4/Release_NotesC_cwin_update6.pdf
[9] https://en.wikipedia.org/wiki/Microsoft_Visual_Studio
[10] https://docs.microsoft.com/en-us/previous-versions/visualstudio/visual-studio-2010/dd465215%28v%3dvs.100%29
[11] https://devblogs.microsoft.com/oldnewthing/20180307-00/?p=98175

Detecting invalidated iterators in Visual Studio

Introduction

When working with the STL you certainly are using iterators at one point or another. One of the common mishaps when working with iterators is to run into undefined behavior if the iterator is or becomes invalid. This can not only happen due to obvious reasons (like missing to initialize an iterator) but also when performing certain container operations.

Undefined behavior due to iterator invalidation

Take a look at the following code sample:

We define a simple class which stores an id and provide a Print()-function which outputs the id to the console.

We then construct 4 elements of these classes and add them (as pointers) to the vector.

Finally we loop over the elements, output the current item, and add two more elements in there.

If you run the code in release configuration, it might produce the output you more or less expected/intended, produce some garbled output, or might crash.
Doing a couple of successive test runs using VS 2015 Update 3, the following output was produced:

In another run the same application triggered this output however:

The issue in the code is most likely quite obvious to everybody. Inside the for-loop we push additional elements onto the vector. Vector iterators are invalidated however, if a reallocation occurs. [1]

So the result due to adding the vector::push_back() calls inside the for-loop is us causing undefined behavior. Bare in mind that while it’s an obvious issue in this tiny code sample, it can be a really hard to trace down these kind of issues in real world applications especially if these are hugely complex and/or lacking a proper system design.

One of the more nasty results these bugs can cause are memory corruptions which can be a headache to resolve especially if the conditions are strongly impacted by the exact runtime conditions between multiple threads which can make them close to impossible to trigger reliably (and even if they trigger, it’s not guaranteed that they cause a memory corruption in all runs as presented above already – that’s the nature of the behavior being undefined).

_ITERATOR_DEBUG_LEVEL comes to help

Fortunately, the developer is not left alone to trace down these issues. Visual Studio provides built-in checks in its STL implementation which detect such issues and trigger assertions/runtime exceptions if an issue is detected.

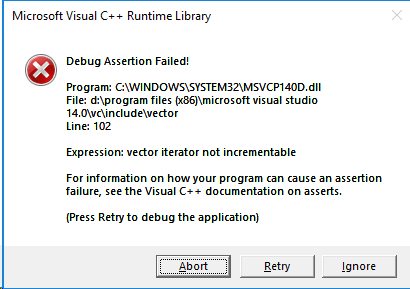
When you run the sample code above in debug configuration, you’ll get the following assertion:

The debugger will directly point you to the fact that using the ++-operator on the iterator triggered the assertion as the iterator became invalid after the previous push_back() call.

These detailed checks are part of Visual Studio’s Debug Iterator Support [2] which contain quite a bunch of checks to ensure proper/valid usage of STL iterators.

These checks are obviously not free and degrade performance and increase the memory footprint of an application. Therefore, these checks are disabled in the release configuration by default and only enabled in debug configuration.

Different levels for _ITERATOR_DEBUG_LEVEL

The checks come in two flavors: level 1 (aka: Checked Iterators) and level 2  (aka: Debug Iterator Support) checks.
While level 1 checks perform certain cheap checks on iterators which ensures that out of bound access is detected [3] (as it is the case in the sample code above), level 2 checks perform additional more costly checks and therefore can detect other type of programming mishaps.

The level can be set using the _ITERATOR_DEBUG_LEVEL macro. However, level 2 checks require the use of the debug versions of the Microsoft Visual Studio runtime (i.e. /MDd or /MTd) and therefore are practically limited to the debug configuration.

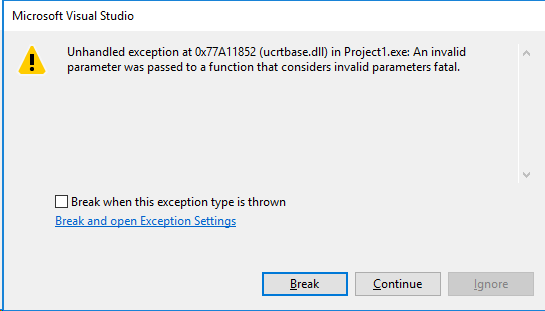
Level 1 checks on the other side are also supported in release builds and if we add

as the first line in the sample code above and run the program in release configuration we get the invalid parameter handler exception:

This makes it straight forward to detect such issues and prevents situations where you are spending days or even weeks tracing down memory corruption which are caused by such bugs.
Enabling iterator debug level can therefore be a real time safer.

Caveats of the _ITERATOR_DEBUG_LEVEL

The challenge to use the iterator checks is to enable the feature. While it’s enabled by default in debug configuration and therefore will basically work out of the box, debug configurations are not always something you can use in larger projects (f.e. in games). It also won’t cover situations where the conditions triggering iterator invalidation only occur in the release configuration (f.e. since the conditions are related to certain optimizations which change the runtime behavior of the program or when certain debug checks set up in the debug configurations are skipped).

You therefore might require to enable it in release builds – but this can imply a certain work overhead when 3rd-party libraries have to be taken into account.

The _ITERATOR_DEBUG_LEVEL setting must be set to the same value throughout all libraries linked with the program. Since the default setting for this is to have it disabled in release configurations this means that one has to (re-)build all 3rd-party libraries by himself and enable the setting for all libraries.

Fortunately, it’s mostly a thing of the past not being able to get access to 3rd-party source code when licensing  libraries/frameworks/SDKs. So technically this should be doable. Depending on the project, this however can still be quite an undertaking.

If you happen to work on such a project where using the debug configuration for your daily work is unfeasible due to performance limitations, you might wanna consider introducing a third project configuration which corresponds to your release configuration PLUS the addition of enabled iterator checks. There might be other settings worth changing for such a configuration too (f.e. disabling the whole program optimization to safe time in building your project for the daily work but still keep it close to the released version) and a separate “developer release” configuration will also enable you to add code only used for development while leaving it out of the shipped versions.

A historical side note

Checked iterators is nothing which was recently introduced and has been around in Visual Studio for over a decade. In versions prior to Visual Studio 2010 it was however using two other macros:

  • _SECURE_SCL
  • _HAS_ITERATOR_DEBUGGING

These have been deprecated in favor of the new _ITERATOR_DEBUG_LEVEL macro and should be replaced with that one.

Also if you previously tried out the iterator debugging functionality you might have deemed it unsuitable for your needs. Earlier versions of Visual Studio suffered certain bugs triggering false positive assertions and especially at the beginning the implementation wasn’t too performant. Microsoft has worked on these downsides over the past [4] and especially the level 1 setting has a very low performance overhead in the experience of the author so you might wanna give it another try.

Conclusion

Iterator checks can be a real time safer for the daily work. Especially in larger projects with multi threading and different developers of varying experience level its advantages can easily rectify the required effort of enabling it in the project.

Bare in mind that even if you are lucky and never do the mistake of writing code causing invalid iterator use, having enabled iterator checks can still safe you time, because when investigating certain issues (like memory corruptions) you can be quite certain that the cause of these sometimes really hard to trace down bugs are unlikely iterators which became invalid. Therefore, you can rather focus your effort on other potential root causes and should be able to trace down the issue much faster.

References

[1] = C++11 standard / Working Draft N3242 – 23.3.6.5.1 “Remarks: Causes reallocation if the new size is greater than the old capacity […]” / 23.3.6.3.5 “Remarks: Reallocation invalidates all the references, pointers, and iterators referring to the elements in the sequence. […]”
[2] = https://docs.microsoft.com/en-us/cpp/standard-library/debug-iterator-support?view=vs-2017
[3] = https://docs.microsoft.com/en-us/cpp/standard-library/checked-iterators?view=vs-2017
[4] = https://devblogs.microsoft.com/cppblog/c1114-stl-features-fixes-and-breaking-changes-in-vs-2013/

Tracing down application freezes.

Introduction

A not too uncommon issue with larger projects (especially when utilizing  multiple threads / for example: games) are freezes (or alternatively called: application hangs). From a user point of view these look like the app/game is not responding at all and just hangs.

As of Windows Vista a new functionality was added. The so called: “Window Ghosting”. [1] Without going into too much detail, this feature basically detects if an application responds within 5 seconds to the Windows message queue and if it doesn’t, marks the application as “not responding” and eventually provides a popup to the user allowing him to terminate the application. This “potential” freeze will then be uploaded to the Windows Error Reporting facility, where registered developers can access the details about the freeze conditions.

The caveat here is that your company might not want to invest the time/cost associated to get access to this data or might have intentionally disabled the Window Ghosting functionality, because it would cause issues with your particular application.

Retrieving user provided dumps

An alternative to the Windows Error Reporting facility is to ask users to provide you with two successive dumps at the time they experience the freeze/hang.

The idea is that you can then simply review the callstacks in the two dumps and directly see if a particular thread hangs inside a loop or might have run into a deadlock condition.

Retrieving two dumps is important, since a single dump just represents the current state of the app but doesn’t necessary proof that the dump shows a freeze/hang condition (i.e. the application might just be utterly slow in what it’s doing atm and you might misinterpret the current dump-state as a freeze). A second dump however provides you with the means to compare the two application states which usually should point you directly to a freeze or alternatively proofs that the app did not run into a freeze at all (in which case you might be looking at a performance bottleneck of the app which would have to be tackled to resolve the issue at hand).

Luckily starting with Windows Vista it became much easier for users to provide dump files for developers. [2] While before Windows Vista, users had to install additional tools (like ProcDump) which for a non-developer are not too intuitive to use, ever since Windows Vista the functionality to create dump files got directly built in into the task manager.

Creating dump files using the task manager

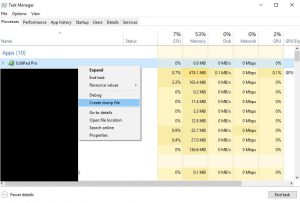
To create a dump file on Windows Vista or later, open the Task Manager (f.e. by right clicking the task bar and selecting: “Task Manager”), locate the unresponsive application in the list, right click the entry and select: “Create dump file”.

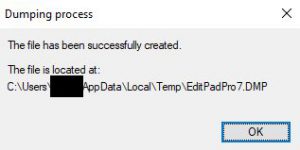
A popup will appear stating that the dump is being generated. Especially for larger applications like games, this can take up to several minutes. Eventually the dump will have been generated and another popup appears stating the location the dump was generated at:

As the user you should then wait a couple of seconds and repeat that step. Afterwards you can provide the developer/support with the two dump files so they can work out what caused the application/game to freeze/hang.

Be aware however, that these files are rather large in size. It’s not uncommon for these to be several GB large. Fortunately they can be compressed quite good (compression factors of 10-100 are not uncommon to achieve).

A word on privacy

Please be aware that these dump files are basically full dumps of the application state including the entire memory section the application uses (that’s the main reason for why the dump file is so large), all the modules currently loaded on your machine, and additional system details which might contain personalized information.

Since the dump contains the entire memory footprint the application has access to, it will also contain any personal data (even potentially unencrypted passwords) the application might have stored. Even if the application doesn’t store passwords/personal data itself, the dump might still contain personal information and passwords which other applications missed to properly cleanup before freeing the memory section (i.e. if another application is suffering a security issue). So be careful whom and how you send these dumps to.

References

[1] = https://blogs.technet.microsoft.com/askperf/2010/09/10/de-ghosting-your-windows/
[2] = https://blogs.msdn.microsoft.com/debugger/2009/12/30/what-is-a-dump-and-how-do-i-create-one/

Initialization/Termination order of globals and local statics.

Introduction

The previous blog post got into details about how to control the order of initializing globals in Visual Studio (in regards to the order in different translation units which is undefined by the C++ standard).

However, the standard doesn’t leave things completely at the compiler’s discretion when it comes to the order within a single translation unit.

This second blog post will describe this and also a not so widely known behavior of when static local objects are terminated.

Initialization order within a single translation unit

While the standard doesn’t define the order to initialize global objects in different translation units, it’s quite specific about the cases when initializing globals within the same translation unit (with the single exception of class template static data members). [1]

The rule for the order is quite simple: Objects are initialized exactly in the order they are defined.

Good practice therefore is to put a list of all definitions of globals at a single place within the cpp file (f.e. at the end). The order these globals are defined then provides a direct overview/documentation of the order these objects will be initialized.

In this example, there are two global/static objects defined. Because of the order in the initialization list, g_String will be initialized before A::MyNumber.

Initialization order of static locals

Well known should be the fact that local statics get initialized only once and it’s ensured (by the standard) that the initialization is done prior to the local object being used. Hence, it’s common practice to write constructs like the following one, to ensure that costly operations are performed only on demand:

Assume the constructor of the class Bar would allocate some limited resource. Since Bar is defined as a local static, the developer surely expects that the resource is only allocated if foo() is called (and not, if the application doesn’t call foo() at runtime at all). Having dealt with quite a bunch of different build environments, that’s also the behavior the author always experienced in reality.

Regardless, the standard also allows a different behavior and explicitly permits implementations to perform the initialization of static local objects according to how globals are initialized. [2] In effect this means that localBar could get initialized by a certain compiler already when the application starts up.

Termination order of globals and static locals

If you ask 10 C++ developers in which order globals/statics are terminated, you most probably will have 9 out of these 10 tell you that these will be terminated in reverse order of how they were initialized. While this is true in most cases, it doesn’t stand for static locals in all situations.

Try out the following example:

Running this sample code, you’ll get the following output:

What’s unexpected to most developers here is to see that the local object A is destroyed before B, even though the initialization order was the same (i.e. A was constructed before B).

If you’d slightly modify the example and call Test() inside main() rather than in the ctor for A, you’ll get the “usual” termination order and will see that the dtor of A is called after B’s dtor.

The explanation for this quite specific behavior can be found in the C++ standard as well. [3] In easier words than used in the standard it means that if a static locals is initialized during the construction of a global object, it will be terminated after the object which called the function with the static local in its ctor.

References

[1] C++ 03 standard – 3.6.2 (1)
“[…]Other objects defined in namespace scope have ordered initialization. Objects defined within a single translation unit and with ordered initialization shall be initialized in the order of their definitions in the translation unit.[…]”
[2] C++ 03 standard – 6.7 (4)
“[…]An implementation is permitted to perform early initialization of other local objects with static storage duration […]. Otherwise such an object is initialized the first time control passes through its declaration;[…]”
[3] C++ 03 standard – 3.6.3 (1)
“[…] These objects [objects of static storage duration] are destroyed in the reverse order of the completion of their constructor […]. […] For an object of […] class type, all subobjects of that object are destroyed before any local object with static storage duration initialized during the construction of the subobject is destroyed. […]”


Initialization order of globals in Visual Studio.

Introduction

Any developer sooner or later will stumble across the issue of the undefined order global and static objects are initialized at.

A not so uncommon example is when using a custom memory management system. Usually you want the memory management system to be initialized prior to any allocation which occurs and after all the allocated memory was freed again.
This is problematic, if global/static objects rely on memory allocations.

The wrong approach

Assume you would initialize the memory manager as the first call in your main()-function and shut it down as the last step prior to returning from main().

The issue you will end up with is that other global objects are initialized prior to your initialization call in main(). You might consider it being a solution to perform some implicit initialization of the memory manager. Besides this coming with added complexity and some (unavoidable) performance penalty, it won’t help with the issue that when you shut down the program, the corresponding destruction of these globals will happen after the main() function already returned and the memory manager was shut down.

You might think of handling this too then, but that won’t work (at least not in a sane/clean way) because your memory manager will certainly require some resources which need to be freed at shutdown.

How about atexit()?

So you might consider the alternative approach and use an atexit()-registered function (your shutdown function). This is however especially bad for a memory manager because:

  1. atexit()-registered functions are processed in LIFO order and so won’t change the behavior you faced above with calling the shutdown function last in your main() function
  2. atexit uses heap-allocated memory which you presumably directed through your memory manager

Let’s use a global

So the third idea comes to mind and put the initialization and termination handling of the memory manager in a global object’s constructor/destructor itself.

The problem you are facing here is the issue of how you’d be able to control that this particular global object is initialized before all other global objects and destroyed last.

The solution

A common approach to prevent problems caused by the undefined order is to stop using global and static objects altogether (f.e. by relying on pointers and defining an explicit initialization order in the app’s main() function). However, this approach is not always feasible and comes with certain drawbacks (which are outside the scope for this blog post). [2]

A different solution is provided in Visual Studio (with the MS CRT) by means of the “init_seg”-pragma which can be used to control the initialization order. [1]

To understand how this works, you should know that global objects are initialized as part of the CRT initialization. [3]
In particular, the CRT adds the initializers for all globals in the “.CRT$XCU” [4] linker section. The trick is now to use the “init_seg”-pragma to specify that the initialization of globals in the corresponding translation unit should go in a different section (i.e. one before the “.CRT$XCU” section but after “.CRT$XCA” [5]).

That can be done by adding the following pragma to the particular cpp file containing the global initialization:

#pragma init_seg(".CRT$XCT")

This ensures that your globals in the translation unit will be initialized prior to other globals of your application.

A word of warning

However, be careful with that approach and be aware that your global objects constructors will be called prior to other global objects (including potentially global objects used by the CRT itself!). [6]

Also bare in mind that this is kind of an advanced feature which is not too widely used and is (as far as the author is concerned) not an officially supported approach/functionality. That means that different CRT versions (even different flavors like debug vs. release runtime) can emit different behavior by putting initialization code in different sections. Your application might just work fine for years but suddenly stops working and experiences crashes (f.e. after a security update to the CRT was released or after you ported your application to a later VS version).

The second concern you need to be aware of are interactions with 3rd-party libraries. If you use different libraries these could also use the trick to put their own initialization related code in the CRT linker section and your code might then run after (or before) the other lib was initialized.

It’s therefore important to consider which section you put your initialization code in. In general it shouldn’t be a bad idea to put it into the “.CRT$XCT” section (i.e. closest reasonable section just before the “.CRT$XCU” section where other globals will be initialized in) rather than trying to put it in the earliest one (i.e. “.CRT$XCB”). That way you should be on the safer side with regards to a not yet completely initialized CRT which could cause quite a couple of sleepless nights tracing down some weird undefined behavior in your application.

On top of this, it’s also good practice to keep the constructor/destructor of such global objects as simple as possible and defer any initialization/termination code to be done as part of the normal program flow (i.e. during main()). This ensures that you are less likely to run into issues due to an incompletely initialized dependent global object (which could be part of the CRT or a dependent 3rd-party library).

Verifying whether you run into an issue with the global initialization order

If you run into a crash with the callstack pointing to the dynamic initializer list when starting your program which wasn’t present without the pragma statement, it probably means you did overlook such a global object dependency. To validate this, you can make use of the linker’s map output file and review which CRT-linker sections are used.

To do this, first you comment out the “init_seg”-pragma statement and then rebuild the program with the map output file. Using a text editor you should be able to locate the “.CRT$XC” sections at the top of the map file which could look like this:

These are sorted alphabetically and you’d see if there’s a section which unexpectedly comes before the section you put your global in. If so, simply change the section you use to a later one.

If you found this information interesting, you might also be interested in this follow-up blog post regarding further details related to the initialization order of globals.

References / Footnotes

[1] https://docs.microsoft.com/en-us/cpp/preprocessor/init-seg?view=vs-2017
[2] https://stackoverflow.com/questions/6939989/global-c-object-initialization#6940356
[3] https://docs.microsoft.com/en-us/cpp/c-runtime-library/crt-initialization?view=vs-2017
[4] To be precise the section name is actually .CRT with XCU being the section group.
[5] The XCA group specifies the __xc_a pointer which marks the start of the global initialization list and therefore no initialization should be put into that group.
[6] https://developercommunity.visualstudio.com/content/problem/335311/access-violation-with-mtd-and-init-seg-pragma.html

The trouble of separate module atexit-stacks

The demo project (Visual Studio 2015 solution) demonstrating the behavior in this article can be downloaded here.

Introduction

Using atexit() to specify functions to be called if an application terminates is quite common practice. This is especially true for libraries since the C-standard specified atexit()-function is a way for the library to register its cleanup logic without relying on the 3rd-party application to properly call a specific cleanup function.

This is also what the library the author was working with did. Since the usage of the atexit()-function is nothing uncommon, it was quite surprising to observe that obviously the cleanup handling (which got registered via the atexit()-function) occurred after some resources were already freed when compiling the code with Microsoft’s Universal C runtime. In this particular case, this fact resulted in the cleanup function being stuck in an endless loop with the result of the app never terminating.

Well known behavior of atexit()

To understand the root cause of the problem, let’s first take a look at a simple case of using an atexit()-registered function to stop a thread and wait until the thread terminated before the hosting application closes cleanly:

(Sidenote on this code: The code is kept as simple as possible to demonstrate the actual problem. The fact that it’s not really thread-safe is not relevant for this topic.)

As we see, the test case is quite simple.
main() spawns a simple worker thread (dummy_worker()) which increments a threadCounter when it’s started, waits until running is set to false just to decrement the threadCounter again.
In main() we register the terminateThread()-function using atexit() so to make sure that we cleanly shut down the running thread.
To do that, terminateThread() sets running to false and waits until the thread got signaled (i.e. terminated) via WaitForSingleObject() just to print out the current thread counter value (which we certainly expect to be 0 at this point).
Right before we return from main() we give the thread some time to ensure it’s started.

Running this app, we see it behaves as we expected and get the output:
done waiting – counter is: 0

No big surprise here.

atexit() and DLLs

Now let’s make things a bit more interesting and move that code inside a DLL (into the startThread()-function) and call that from the application’s main()-function.

Certainly we expect to see the same behavior we saw before. So let’s get the console output:
“done waiting – counter is: 1”

This is not quite what we expected to see. In the end we did cleanly terminate the thread… Or didn’t we?

Understanding what’s going on

To get a better feeling of what’s going on here, let’s add some debug output.

  1. We add another atexit()-registered function (in the application’s main()-function).
  2. We add some output to DllMain() to see how attaching and detaching of threads/processes works.
  3. We print out the state of returning from main() right before it returns.
  4. We add some output at the start of the terminateThread()-function.

Running that code, we get the following output (numbers represent line numbers for reference):
1: process attach
2: thread attach
3: returning from process main
4: atExitMainProcess
5: process detach
6: terminating thread
7: done waiting – counter is: 1

We see that atExitMainProcess() gets called after main() returns, followed by the process detach signal the DLL got, followed by the call to terminateThread() which we registered in the DLL via atexit().

This gives us two interesting hints:

  1. there is no output for the detaching of the thread
  2. the atexit()-registered function of the DLL is called after the atexit()-registered function from the main process

Digging into the depths

To understand the first part, we’ve to know that terminating a process issues a call to ExitProcess() in the VS runtime if the process returned from main(). [1]
The first thing ExitProcess() does is to terminate all threads of the process (excluding the calling thread) WITHOUT receiving a DLL_THREAD_DETACH notification. [2]
That explains the fact that we do not receive the thread detach output.
Keep in mind the following additional facts to understand the conclusion further down:

  • after threads were terminated, they become signaled
  • for all DLLs the process-detach notification is sent (that corresponds to line 5 in the output)
    Note, that before that step in the ExitThread() processing, the atexit()-registered function in main() was called (output: line 4)

Let’s keep these facts in mind and take a look at the second part now:

We got the output from the process’ atexit()-registered function BEFORE the output of the function we registered via the atexit()-call in startThread(), even though atexit() is defined to run the registered functions in LIFO order [3]. So why did we not get the call to terminateThread() before atExitMainProcess() was called?

The explanation is that in the VC runtime each module (i.e. each DLL and each process) has its own separate atexit-stack (as Dough Harrison explains in these threads [4/8]). This minor detail makes a fundamental difference in this scenario because it means that the order of the registered atexit()-functions is not only dependent on the order of atexit()-calls, but also in which context (i.e. module) they got called.

Understanding the behavior

Now we got to the point of understanding what is going on here.

  1. Upon the process termination, the process’ atexit()-function stack is processed (ouput: line 4).
  2. ExitProcess() is called and terminates our thread without the thread-detach notification.
  3. The thread is signaled.
  4. The process detached notification is sent to the DLL (output: line 5).
  5. The DLL is unloaded and processes its own atexit()-function-stack which calls our terminateThread() function (output: line 6).
  6. The call to WaitForSingleObject() returns immediately (since the thread got signaled already).

Hence, we end up with threadCounter still being set to 1.

What the standard says

The question would arise whether this behavior actually violates the C or C++ standard.
As far as the author can determine there is no violation of the standard. Actually it turns out that the termination of threads prior to their atexit()-functions being called is to prevent undefined behavior as it’s specified in the standard itself [5] which explicitly states that threads can be terminated prior to the execution of std::atexit registered functions in order to prevent undefined behavior. This is particular noted to allow thread managers as static-storage-duration objects.

On the other side the specification of atexit() [6/7] doesn’t prevent the usage of different atexit()-function-stacks per module. So again, there’s no standard violation here.

That said: It’s an implementation detail that there are multiple different atexit-stacks and it’s also an implementation detail when the atexit-functions are called in relation to when threads are terminated.

How developers can deal with the facts

For library developers it seems that there are limited options to cope with the situation. Here’s a list of possible approaches to compensate for the difference in when atexit()-registered functions are called:

  • ensure your cleanup code actually handles the scenarios where resources were freed already prior to the cleanup function having been called
  • do not use atexit() at all (or at least not in the context of DLLs) but rather provide your own cleanup function which is documented to be required to be called by 3rd-party applications utilizing your library to ensure proper resource cleanup
  • do not provide means to do explicit cleanup, but rather leave that task with the OS (which implicitly will cleanup resources eventually)

Conclusion

The combination of using separate per module atexit-stacks and the fact that threads which are registered from a module are killed (without notifications) prior to the module’s atexit()-registered functions having been called, makes the usage of atexit()-registered functions kind of unsuitable in situations without complete control about how the code is utilized (i.e. in libraries).

The lack of explicit requirements from the C/C++ standard in this regards, which might have been intentional and done that way for completely valid and sound reasons (which however would be beyond the author’s knowledge) does not help much with the situation unfortunately. It also raises the question whether this behavior makes sense from a design point of view and whether such a behavior doesn’t defeat the purpose of the atexit-design/-purpose (and therefore could be argued to be a defect in the standard).

The usage of per module exit stacks is at least questionable in the opinion of the author, because as it stands, at least for platform and compiler independent library development the lack of an explicit requirement in the standard adds additional complexity to the design requirements of functions being utilized via atexit()-calls.

Acknowledgments

The author would like to thank Branko Čibej and Bert Huijben for their contributions in investigating the topic and sharing their own opinions on this matter.

References

[1] = Windows Kits 10.0.10240.0 source code: ucrt/startup/exit.cpp: exit_or_terminate_process()
[2] = https://msdn.microsoft.com/en-us/library/windows/desktop/ms682658(v=vs.85).aspx
[3] = https://msdn.microsoft.com/en-us/library/tze57ck3.aspx
[4] = https://groups.google.com/d/msg/microsoft.public.vc.language/Hyyaz2Jpx-Q/t1ADCsPTikoJ
[5] = C++ Working Draft N3242=00-0012 – 3.6.3 paragraph 4
[6] = C++ Working Draft N3242=00-0012 – 18.5 paragraph 5-8
[7] = WG14/N1256 Cinnuttee Draft — September 7, 2007 ISO/IEC 9899:TC3 – 7.20.4.2
[8] = https://groups.google.com/forum/?hl=en#!msg/microsoft.public.vc.mfc/iRo37usY3vU/4Txo3KHfi0MJ

The need for copyrights

Whoever starts working on adapting an existing open source project (or creates his own) eventually will get to the question about how to deal with existing copyright notes and whether and how to add ones own to existing (or new) files.

The first question is: Are copyright notes legally required?
The short answer to this question is: No. Legally the copyright notes carry no weight. They can actually be completely omitted from source code and ones own work, without impacting the fact that the work is still under the author’s copyright. However, copyright notices can help and are easy pointers for everyone to get the copyright information.

I found a really nice article while googling for the question from Ben Balter [1] who gets into some more detail on the topic.

I for myself have therefore decided to always add my own copyright markers to source code files [2]. Since I normally just take over the existing license of the original source code, I simply add my copyright just behind the existing copyright notes. (Note: this is due to my changes normally being just minor compared to the existing work and hence I want to support the idea of the original author by ensuring my modifications are covered by the same freedom he offered his own work for).

For source code not maintained in a publicly accessible version control system, I also add a note about the changes I did, so everybody can determine which part of the source code (or which modifications) are covered by my copyright in contrast to everything else, which is covered by the original author’s copyright.

Bear in mind that different licenses might however have different requirements on how to relicense your modified source and how to deal with existing copyrights.

References

[1] http://ben.balter.com/2015/06/03/copyright-notices-for-websites-and-open-source-projects/
[2] http://softwareengineering.stackexchange.com/questions/157968/how-to-manage-a-copyright-notice-in-an-open-source-project

STL and the <-operator

Introduction

The Standard Template Library (STL) adds a lot of fundamental functionality to C++. One of its most prominent features are containers. Containers can be used to store any kind of objects. Various different containers are available for the different requirements a developer might have. Some of the containers are optimized for random access, while others are very efficient when it comes to sorting objects.
To be able to sort objects, the STL containers (and functions) make use of comparators and/or an object’s <-operator. That way it becomes quite easy for developers to create classes which can be stored in a container. But there are a couple of requirements for these comparators, as this paper lays out.

Strict Weak Ordering

Let’s assume we have a simple class called “Car”:

Next we define a <-operator for our “Car”-class by sorting it by its color and its type:

Now we create 2 instances of the class:

If we’d call: bool bsmaller = car1 < car2; // bsmaller = true the result would be as expected (since car1.m_Type < car2.m_Type).
Now let’s put these cars in a set:

So far, so good. We have a container with two cars, so what? — Let’s put another one into the container and see what happens:

Outch… That results in a runtime error at best, or undefines behavior at worst.

<-operator requirements

What went wrong?
Well, the problem lies within our defined <-operator and the fact that the set-container uses it to try to put our cars into an order. If we compare car2 with car3, we get contradictory results:

Therefore, the set doesn’t know how to sort these objects in its internal red/black-tree.
For most of the STL functions/template classes which require a comparator, a so called strict weak ordering comparator is required. Such a comparator is defined by fulfilling the following requirements:

  1. the <-operator imposes an order:
    if (a < b) then !(b < a)
  2. an object is never smaller than itself (i.e. it can’t be ordered before itself):
    a < a = false
  3. the <-operator can be used to check objects for equality:
    if (!(a < b)) && !(b < a)) then a == b
  4. the ordering is transitive:
    if (a < b) && (b < c) then (a < c)

So one might come to the following great solution to the problem and say: “Let’s sort objects by their memory address!”

Nice idea. That comparator meets all the above given requirements, since an object’s address is unique, if run on a single PC (at no time two objects can occupy the same memory address) plus this idea has the advantage that no additional memory (for instance for a unique identifier used to order the objects) is required.
As long as there is no special requirement to keep objects sorted in a special order within a container this can be a feasible solution. However, it’s not completely safe under all circumstances, as the following chapter will uncover.

Copy Constructor and =-operator

Some of the STL functions/containers make use of an object’s assignment-operator or its copy constructor. For instance there is a function called make_heap(). That function creates a copy of the first object and in addition uses the assignment operator of the class of the contained objects to swap objects. That way a heap is created. So why is this problematic?
Well, the functions are designed under the following assumption:
The <-operator compares objects based on their content AND neither the copy constructor nor the assignment operator alter the object’s order.
Given as a general example, the assertion in the following code is expected to be true: if (a < b) { c = a; a = b; b = c; assert(b < a); }
If we use the object’s address within our <-operator, that’s no longer true. Assume a and b have the following addresses: a = 0x1; b = 0x2;
To make it easier to see the problem further assume that each object stores one integer: a.i = 1; b.i = 2;
Before the swap, a is considered smaller than b (since 0x1 < 0x2). Now we swap the objects: c = a; a = b; b = c;
As you see, the objects changed their content: a.i = 2; b.i = 1; but switching should not have an impact on the comparator; hence, assert(b < a) should be true since b now contains the content of a and a contains the content of b, but it isn’t!
Remember, we wrote the <-operator to compare the objects based on their addresses — and these haven’t changed — so a is still smaller than b (since 0x1 < 0x2).
So we changed the order of the objects and the STL functions don’t know what to do about it (resulting in an error or undefined behavior). We need another way to come up with an implementation for our operator.

Comperator Template

Though our initial <-operator meets the first two requirements, it lacks transitivity and therefore can’t be used to put objects into a unique order. We can correct this, by using the following template to write a comparator which sorts an object based on comparing multiple member variables:
For an object of class “A” with “n” member variables m[0, n) where each member variable type provides a <-operator:

The function compares the object’s first member variable. If the current object’s first member variable is less than the second object’s one, it returns true. If it isn’t, it checks both member variables for equality by making use of the second requirement for <-operators (if (!(a < b)) && !(b < a)) then a == b).
Due to the order of the parentheses in the expression, only in case that the first member variable is equal, it compares the second member variable and returns true, if the first one’s is smaller than the second one’s. The procedure is then repeated for all remaining member variables.
Applying that template to our “Car”-class, would result in the following operator:

That’s it. We now have a working strict weak ordering operator.

Conclusion

Writing a <-operator helps a lot to more conveniently work with STL-containers. However, the developer has to be aware of the additional requirements for the implementation and must be careful to make sure that these requirements are met. Failure to do so can easily result in bugs introduced into the code which are really hard to trace down, since they can occur randomly and not all of the logical errors of an <-operator can be traced down by additional checks within the STL implementation.
Nevertheless, having a properly written <-operator at hand is the basis to make use of most of the STL-functions and improves productivity as well as increases code maintainability.

References

[1] S. Kuhlins, M. Schader, 2005. Die C++ Standardbibliothek. 4th ed. Berlin, Heidelberg, New York: Springer. Ch.1.3.
[2] Accredited Standards Committee WG21/N1043, 1996, Working Paper for Draft Proposed International Standard for Information Systems–Programming Language C++. [internet] Available at: http://www.open-std.org/jtc1/sc22/open/n2356/
[Accessed 23 February 2009]. Ch.23.1.2.
[3] P. J. Plauger, A. Stepanov, M. Lee, D. R. Musser, 2001. The C++ Standard Template Library. ed. Upper Saddle River: Prentice-Hall p.134